 Get this pattern and more when you buy the book!
Home | About Us | Contact Jennifer Stafford
free knitting pattern: rounded square pillow
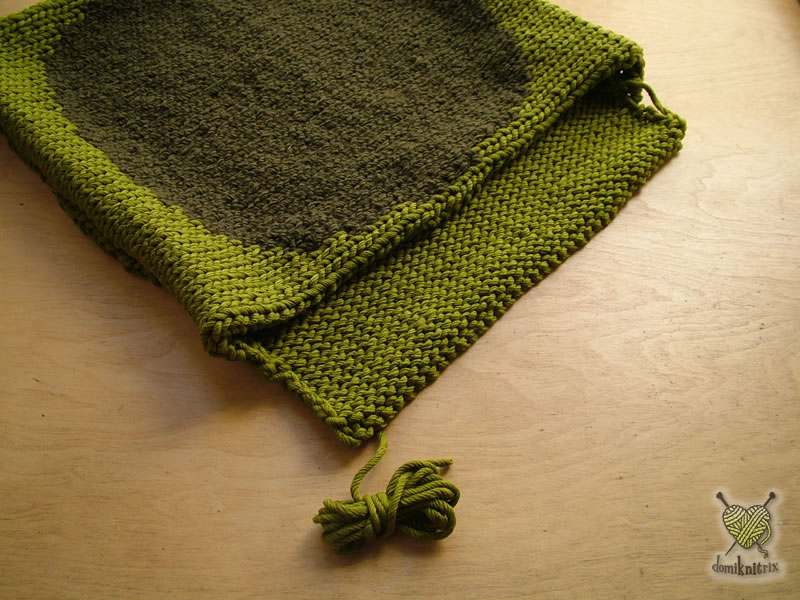
The open flap, before installing zipper and stuffing.
This is my first free pattern! I got this Weekend Cotton from Classic Elite on close-out. I reckon the chartreuse color was not a hot seller, but I love it! It is appealing when combined with Air Wool from Filatura di Crosa, which has a softer, springier texture, but
very similar gauge. This project flies on size 13 needles. The boxed corner makes it square, but not your ordinary pillow. And the rounded square motif on each side has a cool martini lounge feel to it. I plan to have a print-friendly version available for download shortly.
Free pattern! The rounded square pillow is easily finished in a weekend, a perfect introduction to intarsia.
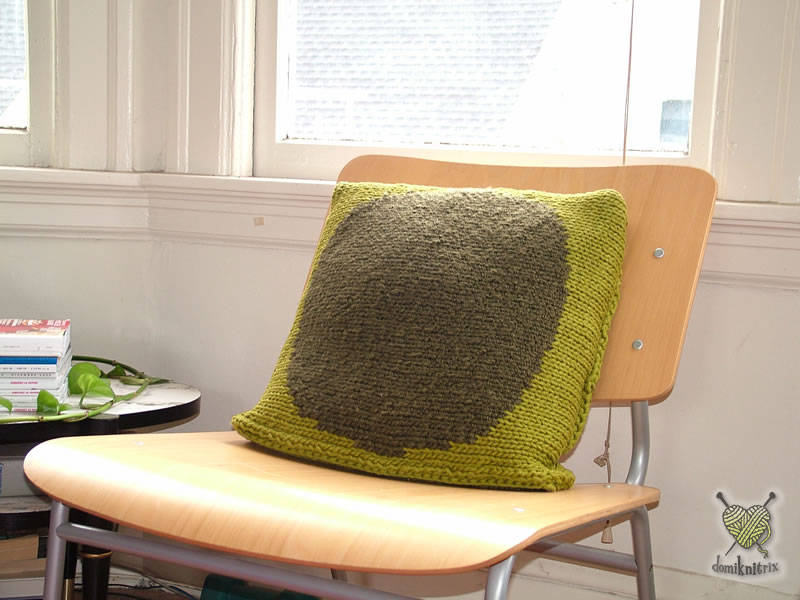
Rounded Square Pillow, stuffed
This pattern is an excellent introduction to intarsia. The chart is symmetrical, and reads the same for right and wrong side rows. I've given the written directions for when to change the yarn, but once accustomed to intarsia, some knitters will find a chart easier to follow. Using the two different yarns here allowed the cover to fit the pillow form more tightly, since Air Wool gives a smaller gauge and more springy and elastic fabric than Weekend Cotton.
Ingredients
- 4 balls of Classic Elite Weekend Cotton in main color
- 3 balls of Filatura di Crosa Air Wool in contrast color
- Size 13 US circular or straight needles (or size to attain gauge)
- 16" plastic or nylon zipper to match main color (metal zip not recommended)
- 1/2 yard of grosgrain or other 3/4" or wider ribbon if matching zipper not available
- Matching heavyweight thread or embroidery floss to sew the pillow together
- 15" pillow form or multiple squares of batting to stuff the pillow
Gauge for size 13 needle
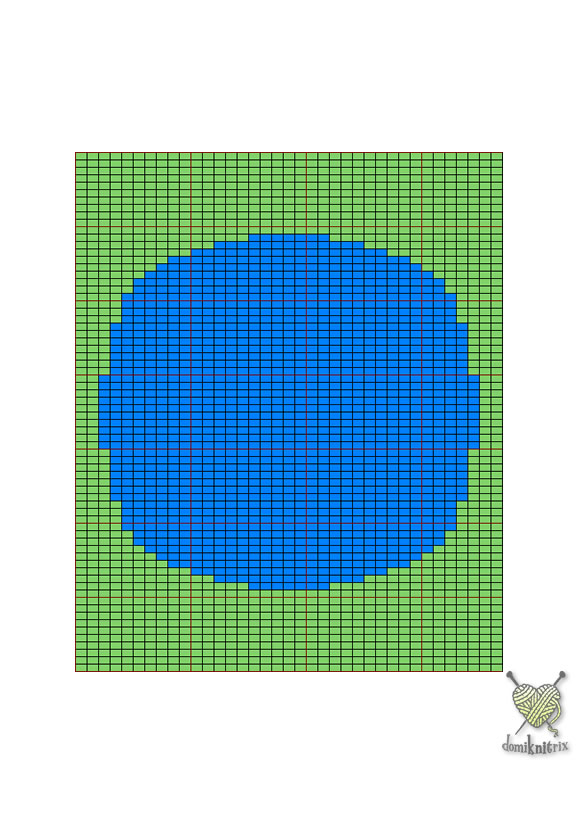
click for printable grid pattern
Weekend Cotton
2.5 sts per inch3.75 rows per inch
Air Wool
2.375 sts per inch
3.5 rows per inch
Regarding intarsia
Each time you change yarns, drop the working yarn in back for the right side rows, in front for the wrong side rows; then pick up the new yarn so that it is wrapped over the yarn you dropped when viewed from the back. So for the right side rows, the new working yarn will be away from you, and on the wrong side rows, it will be toward you, and the dropped yarn will be clinched between the working yarn and the yarn of the next stitch, preventing a hole in the knitting.
Rows that are grouped together are worked the same for several rows, so you can relax and knit until you see the break, for example between rows 11 and 12.
Knit the Pillow
Cast on 37 sts in color A.
Row 1: knit
Row 2: purl
Row 3: knit
Row 4: purl
Row 5: knit
Row 6: purl
Row 7: knit
Row 8: purl
Row 9: knit
Row 10: purl
Row 11: knit
Row 12: purl 15 color A, tie on color B and p7, tie on second ball of color A and purl 15.
Row 13: knit 12 color A, knit 13 color B, knit 12 color A.
Row 14: purl 10 color A, purl 17 color B, purl 10 color A.
Row 15: knit 8 color A, knit 21 color B, knit 8 color A.
Row 16: purl 7 color A, purl 23 color B, purl 7 color A.
Row 17: knit 6 color A, knit 25 color B, knit 6 color A.
Row 18: purl 5 color A, purl 27 color B, purl 5 color A.
Row 19: knit 5 color A, knit 27 color B, knit 5 color A.
Row 20: purl 4 color A, purl 29 color B, purl 4 color A.
Row 21: knit 4 color A, knit 29 color B, knit 4 color A.
Row 22: purl 4 color A, purl 29 color B, purl 4 color A.
Row 23: knit 4 color A, knit 29 color B, knit 4 color A.
Row 24: purl 3 color A, purl 31 color B, purl 3 color A.
Row 25: knit 3 color A, knit 31 color B, knit 3 color A.
Row 26: purl 3 color A, purl 31 color B, purl 3 color A.
Row 27: knit 3 color A, knit 31 color B, knit 3 color A.
Row 28: purl 3 color A, purl 31 color B, purl 3 color A.
Row 29: knit 3 color A, knit 31 color B, knit 3 color A.
Row 30: purl 3 color A, purl 31 color B, purl 3 color A.
Row 31: knit 2 color A, knit 33 color B, knit 2 color A.
Row 32: purl 2 color A, purl 33 color B, purl 2 color A.
Row 33: knit 2 color A, knit 33 color B, knit 2 color A.
Row 34: purl 2 color A, purl 33 color B, purl 2 color A.
Row 35: knit 2 color A, knit 33 color B, knit 2 color A.
Row 36: purl 2 color A, purl 33 color B, purl 2 color A.
Row 37: knit 2 color A, knit 33 color B, knit 2 color A.
Row 38: purl 2 color A, purl 33 color B, purl 2 color A.
Row 39: knit 2 color A, knit 33 color B, knit 2 color A.
Row 40: purl 2 color A, purl 33 color B, purl 2 color A.
Row 41: knit 3 color A, knit 31 color B, knit 3 color A.
Row 42: purl 3 color A, purl 31 color B, purl 3 color A.
Row 43: knit 3 color A, knit 31 color B, knit 3 color A.
Row 44: purl 3 color A, purl 31 color B, purl 3 color A.
Row 45: knit 3 color A, knit 31 color B, knit 3 color A.
Row 46: purl 3 color A, purl 31 color B, purl 3 color A.
Row 47: knit 3 color A, knit 31 color B, knit 3 color A
Row 48: purl 4 color A, purl 29 color B, purl 4 color A.
Row 49: knit 4 color A, knit 29 color B, knit 4 color A.
Row 50: purl 4 color A, purl 29 color B, purl 4 color A.
Row 51: knit 4 color A, knit 29 color B, knit 4 color A.
Row 52: purl 5 color A, purl 27 color B, purl 5 color A.
Row 53: knit 5 color A, knit 27 color B, knit 5 color A.
Row 54: purl 6 color A, purl 25 color B, purl 6 color A.
Row 55: knit 7 color A, knit 23 color B, knit 7 color A.
Row 56: purl 8 color A, purl 21 color B, purl 8 color A.
Row 57: knit 10 color A, knit 17 color B, knit 10 color A.
Row 58: purl 12 color A, purl 13 color B, purl 12 color A.
Row 59: knit 15 color A, tie off color A and k7 color B, tie off color B and purl 15 color A.
Row 60: with color A, purl
Row 61: knit
Row 62: purl
Row 63: knit
Row 64: purl
Row 65: knit
Row 66: purl
Row 67: knit
Row 68: purl
Row 69: knit
Row 70: purl
Bind off in knit.
Now make the opposite side of the pillow in exactly the same way. When complete, both pieces should have the same dimensions: 15" wide and 20" long. If your pieces are larger in size, you may wish to stuff with batting instead, since you can cut this to any size you may need. (More on stuffing after we sew it up.)
Sew the pillow together
Thread a darning needle with about a yard of embroidery floss or a doubled length of strong thread and knot it at the end (to use the knitting yarn would make too bulky a seam). Place the cast-on edge of one piece symmetrically against the side edge of the opposite piece, so that they form a T with wrong sides up. Secure the knot in the corner of the narrow piece by making a few stitches in the same spot. Now sew these edges together with a whipstitch, making sure to catch in the cast-on edge from the right side. Make enough stitches so that there are no gaps along the edge.
When you reach the end of the narrower piece, knot your thread securely at the corner and anchor it in the knitting. Now fold the narrower piece over the other piece so that it looks like a small plus sign (+) with the edge you just sewed appearing a little shorter than the others. It will look like a flattened box.
Match up the side edges to the left and right of the seam you just sewed, leaving a 2.5" gap at top and bottom where the corners will be sewn together. Now sew the side seams in the same manner, starting at the end opposite the first seam and continuing to sew up the 2.5" corner of the box edge. Once you have sewn both sides, you will have a box shape with an open flap ending with the bound off row.
Install the Zipper
If unable to find a matching zipper, cover the side of the zipper tape with the pull in 3/4" wide ribbon to conceal the zipper tape and teeth. Be sure to sew far enough away from the zipper teeth so the zipper still opens smoothly. Sew this ribbon covered edge (with pull facing outside of pillow) symmetrically to the side edge. The zipper teeth will be approximately 1/2" away from the edge of the pillow. Sew the other side of the zipper tape to the flap, placing 1/2" from the edge of the flap so that the teeth will line up. This side of the zipper does not need to be covered. Zip it up to be sure it matches, then unzip and sew up the last 2 corners of the pillow from inside.
Stuff the Pillow
If using the pillow form, simply insert form into pillow and zip up. If using batting, measure at least 4 squares of batting in the same dimensions as the pillow. Stack them on top of each other and insert into pillow. Keep squares lined up with edges of pillow. If this does not give enough fill, cut 2-4 more squares and add squares until pillow is desired volume.
Care and feeding
Pillow cover may be removed and hand-washed. Do not wring; blot excess water with a towel. Reshape and dry flat away from sun. Note that the pillow form will be easier to remove than the batting when you need to wash the cover. Batting may be a can of worms, so remove and replace carefully.

skill level: intermediate
skills needed: intarsia, grafting, zipper
suggested yarn make: Classic Elite
type: Weekend Cotton Air Wool
yarn quantity: 4 + 3
yarn color: chartreuse + olive
needle size: 13
gauge: 2.5 stitches/inch, 3.75 rows/inch